Monday, June 10, 2019

Interacting with Microsoft Access Database in .Net Core Application

I had to work with a program to read/write Microsoft Access Database and I was using .Net Core 2.2 application for processing a large number of files. I later found out that Oledb is no longer supported in the .Net Core world, and then I had to explore additional options. While the Entity Framework option is there, but it would be overkill for the programming needs for the project. I looked into the ODBC based approach and it showed the promise.  After some issues and errors, I was able to successfully connect/interact with the access db.

The AccessDatabaseEngine_X64.exe needed to be installed in the machine. The error message that is thrown due to the missing correct driver (I had 32 bit version before) was vague so it was not immediately evident, but eventually, it worked out.

In this article, I am going to discuss the steps to take in order to connect to access db from within a .Net Core 2.2 application written in C# using Visual Studio 2017.

The content of app.config is fairly simple as shown below which stores a key value for datapath:

The following code snippet shows a method named 'ProcessFile(..)' demonstrating demonstrates the use of interaction with Access. The method processes the *.accdb file in the folder path, an input to the method itself. The method looks into the folder path for an access db file. If the file is found, a connection is made and names of the tables (user tables only) are written in the console. In case of error, it writes the error message.

Wednesday, April 17, 2019

A simple branching strategy to work in CI/CD and Code Review Policy in Agile

Code review is an important step in DevOps to catch any error before the code goes into the production. In a Continuous Integration/Continuous Delivery (CI/CD) model, code review is even important. Tools exist to enforce code review policy in place at source. The idea is that any code change must first be reviewed before the changes are merged to the master branch with the assumption that the master branch only contains duly reviewed code to ensure quality. This article assumes the use of GIT for source control and Team Foundation Server (TFS) or Azure DevOps for build/release and CI/CD. 

When working as a developer, one wants to test the code before it can be reviewed. For testing, in most cases, the build and release pipelines are configured to listen to changes in the master branch. In such cases, a code review policy can overburden the developers by requiring to review a code that may not work correctly. In addition, now the developers need to wait for code review even before testing the code in the dev environment. This may become more important if the system we are developing cannot be tested in the local machines. This also has the potential for slowing down the development activity and sprint velocity which is counter-intuitive to agile. This can cause frustration among developers as well as reviewers. These can be avoided by creating a workflow where developers are able to create, build, deploy and test in a dev environment before requesting a code review. 

This workflow can be handled by creating an improvement in branching and merging strategies and by creating two build/release pipelines. For simplicity, let calls these pipelines as master and dev (e.g., dev for development). The master pipeline is triggered by the changes in the master branch while dev pipeline is triggered by changes in the dev branch. A developer can create a dev branch out of the master, make changes, builds and deploys using dev pipeline, most likely in the dev server, and makes needed tests and then creates a pull request for merger into master branch after review.  From this point on, the master pipeline kicks in and changes are reflected in all the environments such as dev, demo, uat or production as needed. 

With the above workflow, the code review policy was still enforced in the master branch and developers can make continuous changes in the code and tests before submitting the changes for review and ultimately to merge the changes to the master branch. 

In the minimum, we will be looking to three types of branches, namely master, dev and feature which are briefly described below:

Master Branch
o    Primary branch
o    Code review is always needed. 
o    Must be used to build/release in Prod environment
o    Consider this branch permanent.
o    There exist build and release definitions and CI enabled for all environments

Dev Branch
o    Secondary Branch
o    Ideally, be created from Master
o    Can be forced to use master
o    Does not require code review
o    Must not be used for build/release in Prod Environment
o    Consider this branch temporary. Things can be wiped out from this branch.
o    There exist build and release definition looking into this branch and therefore CI is enabled for this branch to deploy to Dev. For other environments, no automatic release from this branch.
o    This can also be used to quick hot fixes.
o    Just to note, if the merging of dev to master results in the elimination of branch (depending on code review request), creating a dev branch from master and pushing that branch to remote is sufficient.

Other Branches (as needed)
o    Feature branches, branches needed for pbi (product backlog item or an issue), etc
o    Can be created by anybody and can be merged to master or dev branch
o    Ideally, be created off master (but can be created from Dev)
o    Once coding is done, can be pushed to Dev branch for build/release in the dev environment
o    Once all coding is done, a pull request must be made for merger into the master branch
o    These are temporary in the remote. But you can keep it locally. So nature is semi-permanent.
o    With pull request, when this branch is merged to master, it is more than likely the branch will be removed from the remote.

Scenario/use case/process:
Some scenario related to development work is described below:

Working on a PBI 
  • Create a branch from master. Name it appropriately, use pbi or feature or certain keyword so that it can be identified easily.
  • Make necessary code changes.
  • Most likely there is dev branch. If a dev branch does not exist for the rep, create a dev branch. If there are no build and release definition for dev branch, make those as well.
  • Merge your branch to Dev (this will trigger build/release in Dev).
  • If all is well, create a pull request off your branch.


Working PBI and PBI has been postponed for future
  • Created a branch and merged code to Dev. The PBI was postponed for the time being. I need another Dev branch.
  • Keep the feature branch in place. Dev is going to be reset with the master branch. Changes made in dev will be gone.
  • Can do 'Cherry-Picking' to recover some changes and bring it to current code 

Working on the dev branch and need to remove all new changes  
  • Select the dev branch. Point to master branch and reset the dev branch to the selected point in the master branch.
  • If needed keep the local changes to a separate branch


Work on the dev branch, but there is no build or release pipeline for the dev branch
  • Clone the build definition. Rename the definition to *-Dev. In the repo, select 'dev' branch. Do the same in the release. Ensure automatic trigger is only limited to 'dev' environment.


The workflow above works, but with certain assumptions. It is safe to merge master to dev (if developers code is wiped off, they can merge the code again from the feature branch to dev at any time). Thus all the developers should know this possibility so that there is no confusion. However, to make the process frictionless, it would be a good idea to talk in the daily scrum. In most cases, the dev branch does not need to be reset as frequently, but it is ideal to have a current code in dev branch as well to avoid working on an older version of the code and to avoid merge conflict in the future.

If the master cannot be merged with Dev, force merge (this will wipe out conflicts and makes the Dev a copy of master). By forcing the merge, you are avoiding manually correcting the errors that are possibly not needed. The changes in dev can be re-applied from the feature branch if needed.

Git Extension (a tool which provides a much better experience than Git tools in Visual Studio) can be used to create, merge, reset and cherry-pick while implementing the branching strategy. This is free and available at https://git-extensions-documentation.readthedocs.io/en/latest/git_extensions.html


Thursday, March 21, 2019

Handling Caching with ResponseCache attribute in the .Net Core MVC web application

The caching of HTTP response implies that when an HTTP request is made, the response generated by the server is stored in some place by the browser or the server for potential re-use in successive HTTP request for the same resource. In essence, we are storing the generated response and reusing that response to the subsequent requests for a certain duration. The storage can take place in the client side such as a browser or server side itself. When stored at client caching of an HTTP response reduces the number of requests a client such as a browser or proxy makes to a web server. The browser caching behavior in a web-application is generally controlled by HTTP headers that specify how or not the client must cache responses. 

In a web application, there is a need to cache certain request for performance. For example, the performance of the application improves by caching resources that rarely change or changes infrequently as this would remove the unnecessary work from the server. On the other hand, certain resources that are likely to change frequently must not be cached to provide the up-to-date resource to the client.  Thus, there is a need to cache certain resource and disallow caching of some other resources. 

In a typical HTTP request and response, caching is controlled by  'Cache-Control" header. The headers can tell what to cache and for how long to both the client and the server. In a .Net Core MVC, the caching can be specified using ResponseCache attribute. 

A simple way to add a caching behavior to an action method is to decorate the method with ResponseCache attribute. In order for the client to cache a response, an action method within the controller can be decorated with [ResponseCache(Duration = 30)]. This attribute will flag the client to cache the response for 30 seconds. The caching of the response can be disabled by decorating the method with [ResponseCache(Location = ResponseCacheLocation.None, NoStore = true)] attribute in which NoStore flag is set to true and CachingLocation is set to None. 


The example below shows that the responses from the Index()  and Privacy() methods are cached for 30 seconds. The idea is that the content generated by these methods are expected to remain static. The response from GetValue() method is not supposed to cache as the response from this method is expected to change from one request to another. Thus,disabling of cache is indicated by NoStore = true and Location = ResponseCacheLocation.None.

using System.Threading.Tasks;
using Microsoft.AspNetCore.Mvc;

namespace Web.Controllers
{
    public class HomeController : Controller
    {
        [ResponseCache(Duration = 30)]
        public async Task Index()
        {
            return View();
        }
        [ResponseCache(Duration = 30)]
        public async Task Privacy()
        {
            return View();
        }

        [ResponseCache(Location = ResponseCacheLocation.None, NoStore = true)]
        public async Task GetValue()
        {
            return View();
        }
    }
}
In order to use the same caching behavior for all the action method of a class, the [ResponseCache] attribute can be decorated at the class level.  For example, in the code below, responses from each of the action methods would be cached for 30 seconds.
using System.Threading.Tasks;
using Microsoft.AspNetCore.Mvc;

namespace Web.Controllers
{
    [ResponseCache(Duration = 30)]
    public class HomeController : Controller
    {
        public async Task Index()
        {
            return View();
        }

        public async Task Privacy()
        {
            return View();
        }

        public async Task GetValue()
        {
            return View();
        }
    }
}
It is also possible to override the caching behavior for one or more methods. For example, in the code below, the class level caching behavior is to allow caching of response for 30 seconds, but by decorating a single method with [ResponseCache], the caching of method's response can be altered. In this case, the response of GetValue() is never cached because of the [ResponseCache(Location = ResponseCacheLocation.None, NoStore = true)].
using System.Threading.Tasks;
using Microsoft.AspNetCore.Mvc;

namespace Web.Controllers
{
    [ResponseCache(Duration = 30)]
    public class HomeController : Controller
    {
        public async Task Index()
        {
            return View();
        }
        public async Task Privacy()
        {
            return View();
        }

        [ResponseCache(Location = ResponseCacheLocation.None, NoStore = true)]
        public async Task GetValue()
        {
            return View();
        }
    }
}
In the examples above there were two primary caching behaviors, one that indicates caching and another that indicates no-caching. The parameters ResponseCachelocation, NoStore and Duration can be put into a profile and used in the .Net Core MVC and reuse those within the attribute. Let's assume that there are types of behavior for caching in an application as follow:
  • Default - every response is cached for 60 seconds
  • Never - no response is ever cached.
These two behaviors can be made into a caching profile. The ResponseCache can be set-up in the StartUp.cs file in the MVC middleware inside ConfigureServices(IServiceCollection services) method shown below:
using Microsoft.AspNetCore.Builder;
using Microsoft.AspNetCore.Hosting;
using Microsoft.AspNetCore.Http;
using Microsoft.AspNetCore.Mvc;
using Microsoft.Extensions.Configuration;
using Microsoft.Extensions.DependencyInjection;

namespace Web
{
    public class Startup
    {
        //....
        // This method gets called by the runtime. Use this method to add services to the container.
        public void ConfigureServices(IServiceCollection services)
        {
            services.Configure(options =>
            {
                // This lambda determines whether user consent for non-essential cookies is needed for a given request.
                options.CheckConsentNeeded = context => true;
                options.MinimumSameSitePolicy = SameSiteMode.None;
            });
            services.AddTransient();
            services.AddMvc( options =>
            {
                options.CacheProfiles.Add("Default",
                       new CacheProfile()
                       {
                           Duration = 60
                       });
                options.CacheProfiles.Add("Never",
                    new CacheProfile()
                    {
                        Location = ResponseCacheLocation.None,
                        NoStore = true
                    });

            }).SetCompatibilityVersion(CompatibilityVersion.Version_2_2);
        }

         ///....
    }
}
In the code above, two caching profiles were configured respectively named “Default’ and “Never”. The "Default' caching profile is intended to cache the response for 30 seconds as indicated by the following line:
       {
              Duration = 30
       }

The "Never" caching profile is intended to request that no caching of response should occur where are specified by the following:
       {
              Location = ResponseCacheLocation.None,
              NoStore = true
       }

Now that the caching profiles are set up at MVC, their action methods can start using it by specifying the name of the profile rather than by supplying caching related parameters. For example, for allowing caching, the attribute is [ResponseCache(CacheProfileName = "Default")] and for not allowing caching, the attribute is [ResponseCache(CacheProfileName = "Never")]. The HomeController class from the example above, can now be modified by decorating the HomeController class with [ResponseCache(CacheProfileName = "Default")] at and GetValue() method with [ResponseCache(CacheProfileName = "Never")] attribute. 
using Microsoft.AspNetCore.Mvc;
namespace Web.Controllers
{
    [ResponseCache(CacheProfileName = "Default")]
    public class HomeController : Controller
    {
        private IWebManager _manager;
        public HomeController(IWebManager mgr)
        {
            _manager = mgr;
        }
        public IActionResult Index()
        {
            return View();
        }

        public IActionResult Privacy()
        {
            return View();
        }

        [ResponseCache(CacheProfileName = "Never")]
        public IActionResult GetValue()
        {
            return Content(_manager.GetValue());
        }
    }
}

With this change above, all the methods inside the home controller will start using ‘Default’ cache profile which essentially will cache the response for sixty seconds.

We have two get methods in the HomeController. The first method is Index() which returns a list of products and another method is Privacy() which returns a view with privacy-related content, and finally a third method, GetValue() which returns some values. In these cases, let's also assume that product types are relatively constant i.e., their data do not change often. However, the products keep changing depending on inventory and therefore not suitable for caching. Because, if we cache the product and the inventory of the product increased or decreased in the database, then the cached response would be incorrect.

We can verify that the caching is working, by doing the following:
  • Run the app locally and go to the index method.
  • Open PostMan or ARC to get the request and see the response header. The response header says that the caching has been used. 
  • Now comment out the response related.
  • Recreate the request in PostMan and review the response header.

Resources:
Response caching in ASP.NET Core. Available at: https://docs.microsoft.com/en-us/aspnet/core/performance/caching/response?view=aspnetcore-2.2

Wednesday, March 20, 2019

How to handle 'Which has a higher version than referenced assembly' error (Error CS1705)

Where there are multiple projects within the solution and one project is dependent on others, and versions introduce breaking changes, we sometimes encounter package version conflict and Visual Studio resulting in build error in the solution. It may return the following error:

Error    CS1705    Assembly 'WebAPI' with identity 'WebAPI, Version=1.0.0.0, Culture=neutral, PublicKeyToken=null' uses 'Microsoft.AspNetCore.Mvc.Core, Version=2.1.1.0, Culture=neutral, PublicKeyToken=adb9793829ddae60' which has a higher version than referenced assembly 'Microsoft.AspNetCore.Mvc.Core' with identity 'Microsoft.AspNetCore.Mvc.Core, Version=2.1.0.0, Culture=neutral, PublicKeyToken=adb9793829ddae60'    WebApiTest    C:\... 

The above error can be produced on a solution that uses two projects, namely WebApi and WebApiTest. 

The error above shows that the test project and API project are using a different version of Microsoft.AspNetCore.Mvc.Core. For example, the test project is using version 2.1.0.0 while the API project is using 2.1.1.0.

We can resolve this issue by updating the package reference in either of the projects to match. For example, we can update the WebApiTest project to use the higher version of the assembly (i.e., at 2.1.1.0) or downgrade the assembly version in the WebApi project to 2.1.0.0 depending on the need. 

We can issue a command like below in the package manager console targetting the right project. For example, the code below will update the assembly reference for Microsoft.AspNetCore.Mvc.Core on WebApiTest test to use version 2.1.1.0. This will then match the version of the same assembly in the WebApi project.  The following code 
Install-Package Microsoft.AspNetCore.Mvc.Core -Version 2.1.1.0 -ProjectName WebApiTest 

The argument '- ProjectName WebApiTest' name can be omitted if the correct project is selected in the dropdown that is available in the Package Manager Console window in the Visual Studio as shown in the figure below: 


Likewise, to update the WebApi project instead, the following command will do the trick:

Install-Package Microsoft.AspNetCore.Mvc.Core -Version 2.1.1.0 -ProjectName WebApiTest 


Tuesday, February 12, 2019

Implementing Async Tasks in Android

keywords: background thread, asynchronous tasks

In an Android app when we need to interact with external resources that may potentially take time such as to fetch data from external API or database, we would like the main UI to remain interactive and block the UI thread from functioning while long-running processes are active.  Also note that by default, network task is not allowed to run in UI thread in Android.


If the main thread is used in fetching external data, then the main UI will not remain interactive while the data is being fetched and may show abnormal behavior if the data fetching process encounters an exception. In this case, the android's asynchronous task becomes handy especially for updating the portion of the UI using background threads.

An asynchronous task is one of the several ways to offload the work of main thread to some background thread. While AsyncTask is not the only option, but it is a simple and quite a common option.

To get started, I would like to visit Google's developer's page that contains information on the AsyncTask at https://developer.android.com/reference/android/os/AsyncTask review some content related to implementing AsyncTasks.

The AsyncTask class is an abstract class. The implementation usually is the subclass of the class that runs on UI thread. The implementation of the AsyncTask, i.e., the subclass, will override at least one method and often two methods.

When an asynchronous task is executed, the task goes through 4 steps  as described in the Android Developers page at (https://developer.android.com/reference/android/os/AsyncTask):

  1. onPreExecute(), invoked on the UI thread before the task is executed. This step is used to set up the task, for instance by making the spinner visible in the user interface. 
  2. doInBackground(Params...), invoked on the background thread immediately after onPreExecute()finishes executing. This step is used to perform background computation that can take a long time. The parameters of the asynchronous task are passed to this step. The result of the computation must be returned by this step and will be passed back to the last step. This step can also use topublishProgress(Progress...) publish one or more units of progress. These values are published on the UI thread, in the steponProgressUpdate(Progress...).
  3. onProgressUpdate(Progress...), invoked on the UI thread after a call to publishProgress(Progress... step. The timing of the execution is undefined. This method is used to display any form of progress in the user interface while the background computation is still executing. For instance, it can be used to animate a progress bar or show logs in a text field.
  4. onPostExecute(Result), invoked on the UI thread after the background computation finishes. The result of the background computation is passed to this step as a parameter.
I am going to go over the code to illustrate the working mechanism. The code is from the capstone project that I did for my Android Nano-degree Program at Udacity. The full code is available at https://github.com/benktesh/Capstone-Project. In this demo, I am using a lightweight version of the code as shown in the code block below:

The class NetworkQueryTask implemented as a subclass of MainActivity and this class extends the Android AsyncTask abstract class. The implementation can be defined as below:  

     private class NetworkQueryTask extends AsyncTask<T1, T2, T3> {...}


The T1, T2, and T3 are datatypes of parameters and each of them has some specific meaning. 

The task defined above can be executed as below:

     new NetworkAsyncTask().execute(param1);

The param1 is of the same type as the type of T1.  

The MainActivity runs on UI thread. The 'onCreate(..)' method does setting up the UI. The setting up involves creating adapters for recycler view and so on and finally calls a LoadView(). The LoadView() method executes AsyncTask to fetch the data from the network and update the adapter of the view.

In doing so, we create a subclass NetworkQueryTask that extends form AsyncTask. The class takes three parameters, string, Void and ArrayList<Stock>.  A stock is a simple class to store information about Stock. As soon as the process starts, we want the spinner to be visible that we can do in the doInBackground(..)  method.


In the task above, the three parameters denote the type of input parameters used for doInBackground(T1 param1), onProgressUpdate(T2 param2)and onPostExecute(T3 param3). When the doInBackground(..) step finishes execution, the param3 will be the output of the doInBackground(..) step and will become an input to the onPostExecute(param3) method. 

The subclass in general overrides at least one method, most often, doInBackground(..) method and also a second method, i.e., onPostExecute(). The onProgressUpdate and onPreExecute() methods are optional and can be skipped. Thus, if there is nothing to be done regarding the progress update, then there is no need for overriding onProgressUpdate and then param2 can be of type Void in the class definition itself. For example, suppose there is a need to pass a string parameter to doInBackground() and no need for an onProgressUpdate() method and the onPostExecute() method takes a string parameter, then the class definition would look like below: 

    private class NetworkQueryTask extends AsyncTask<String, Void, String> {...}


Therefore, we can say that the three parameters respectively represent input for doInBackground(), input to onProgressUpdate(), and input to onPostExecute(). The parameter type for output of doInBackground() is same as the input to onPostExectute(). Also, if the async task is to function as fire and forget such as trigger something, then all the parameters can be void. For example, the definition of the subclass, in this case, would look like the following:

     private class NetworkQueryTask extends AsyncTask<Void, Void, Void> {...}

and the above class is executed as below:

     new NetworkAsyncTask().execute();

AsyncTasks are not aware of the other activities in the app and therefore must be handled correctly when the activity is destroyed. Therefore, AsycnTask is not suitable for long running operations because if the app is in the background and when Android terminates the app that called the AsyncTask, the AsyncTask does not get killed and we have to manage the process of what to do with the results of the AsycTask. Thus, AsyncTasks are useful in fetching data that is not long running. There are other alternatives to AyscTask which are IntentServices, Loader, and JobScheduler and many Java-based implementations.

A youtube video on with code demonstration is available at https://youtu.be/Yxg_janIavw


Sunday, December 16, 2018

Document and Test API with Swagger UI

More than often developers test API, either through a browser request or using some clients such as POSTMANAdvanced Rest Client (ARC). To expose the functionality of the API, we also tend to expose the methods and descriptions, and associated data structure through some means which requires additional work. To complement, either or both of these functionalities, Swagger becomes handy which provides API documentation and API testing by configuration.

Swagger UI is a tool that can be used across API lifecycle. Swagger provides easy to navigate documentation and/or visualization of API resources and enables interaction with API possible from within the application itself making the development and testing effort, as well as end-user experience seamlessly smooth. In this article, I am going to discuss how to implement swagger in API and exemplify some use cases of Swagger UI. I will be using .Net Core 2.0 Web API application and using Visual Studio 2017 IDE. I have created a sample API application with a single controller and four methods as part of the demo which is available for download.

Swagger offers the most powerful and easiest to use tools to take full advantage of the OpenAPI Specification. 

Configuration

Wiring-up Swagger on an application is fairly minimal and can be accomplished in four easy steps namely - installation, import, registration, and endpoint enablement.

The package can be installed in Package Manager Console, or alternatively by going to the NuGet Package Manager menu.
Install-Package Swashbuckle.AspNetCore
Figure 1: Installing Swagger in the Package Manager Console.

Once installed, Swagger must be imported into Startup.cs.
using Swashbuckle.AspNetCore.Swagger;
Then the Swagger as service must be registered within ConfigureServices method of Startup.cs.
services.AddSwaggerGen(c =>
{
    c.SwaggerDoc(_version, new Info { Title = _applicationName, Version =   _version });
});
Finally, the application must enable JSON as well as UI endpoints for swagger within  Configure method of Startup.cs so that end-users can interact to API methods through the Swagger UI.
// Enable Swagger JSON endpoint.
app.UseSwagger();  
// Enable swagger-ui (HTML, JS, CSS, etc.)
app.UseSwaggerUI(c => {    
c.SwaggerEndpoint($"/swagger/{_version}/swagger.json",${_applicationName} {_version}"); 
});
The complete list of Startup.cs file is shown in Snippet 1.

Snippet 1: Content of Startup.cs

Visualization

Upon completing the above four steps, swagger is ready to go. Browse through https://localhost:5001/swagger/v1/swagger.json to get the data in JSON (either in a browser or a client such as POSTMAN, Advanced Rest Client (ARC)). The returned JSON object provides the specification of the REST methods (separated by Controllers) and objects used in API. An example response is Snippet 2.

Snippet 2: JSON Response Sample

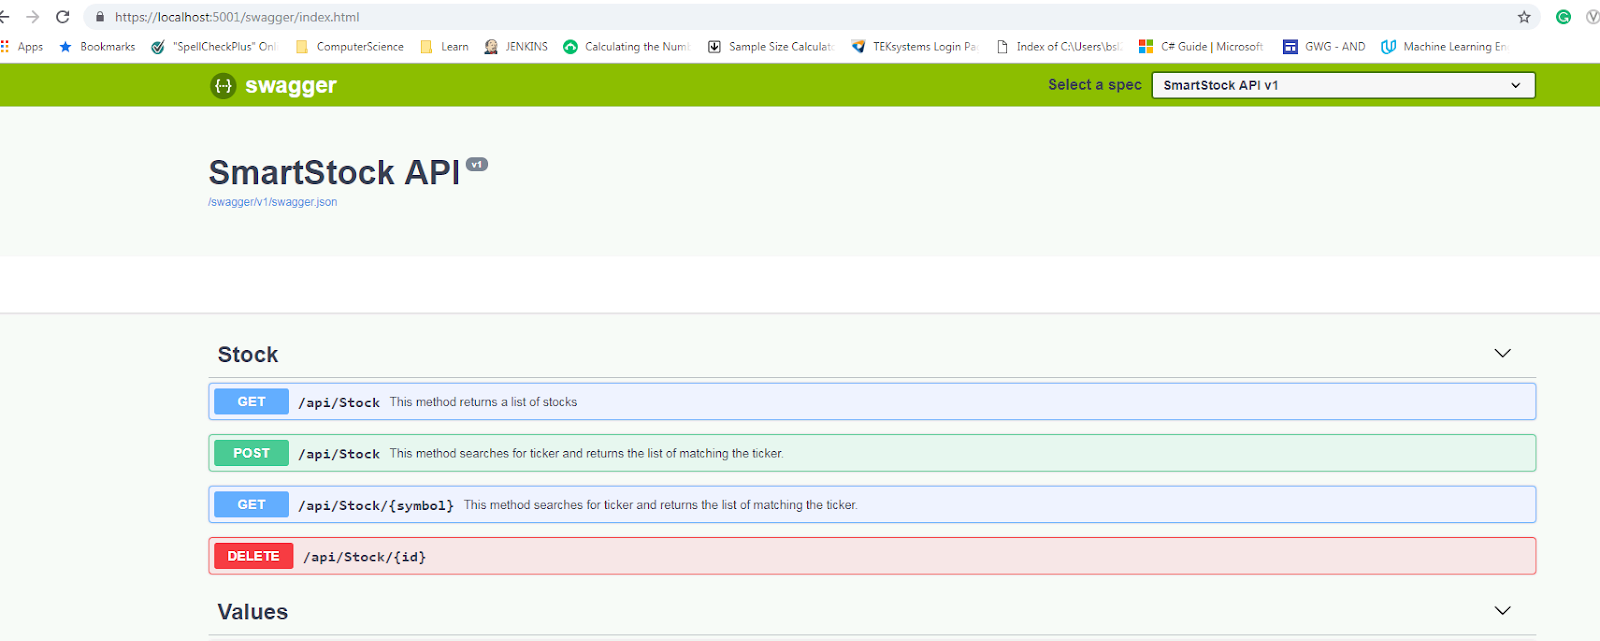
The Swagger UI is accessible by navigating to https://localhost:5001/swagger/index.html where a user can visualize the same data that was available in JSON response in an interactive format. This UI also supports the actual execution of the rest methods.
Figure 2: Visualizing API in Swagger UI

Testing

Swagger provides functionality to test the API methods without any tools. For example, clicking the GET (first tab in Figure 2.) expands the method. By clicking 'Try it Out' and then 'Execute', swagger triggers a call to 'get' method to /api/stock. Note that there is a single controller named 'StockController' in the demo application. The results are shown in the UI which can also be downloaded. Figure 3. shows a result screen for the get method. Any method exposed in the UI can be executed in UI itself, thereby giving us the ability to test the API directly from the API itself.
Figure 3: Testing of API methods in Swagger UI

Support to Attributes 

Routing attributes, Http*attributes are supported by default. Figure 4 shows how the methods decorated with HttpGet, HttpPost, HttpDelete are reflected in the Swagger UI.

Figure 4: Swagger UI reflecting HTTP attributes

Swagger is in sync with attributes in .Net. For example, if a controller class is decorated with [Obsolete] attribute, the UI reflects the fact that the controller is 'obsolete'. Figure 5 shows that the ValuesController is marked 'Obsolete' and Swagger UI reflects the same and is not clickable. This feature becomes handy when API is phasing out certain functionality without breaking the working code.

Figure 5: Swagger UI reflecting the Obsolte attribute

Support XML Documentation

Swagger support Documentation in UI with some configuration change. By adding following lines of code in *.csproj file, the XML document is generated.
<Property Group>
....
<GenerateDocumentationFile>true</GenerateDocumentationFile> <NoWarn>$(NoWarn);1591</NoWarn>
<Property Group>
With the following lines of code in the Startup.cs, while registering, the UI shows the XML documentation.
services.AddSwaggerGen(c => {  ...  var xmlFile = $"{Assembly.GetExecutingAssembly().GetName().Name}.xml";  var xmlPath = Path.Combine(AppContext.BaseDirectory, xmlFile);  c.IncludeXmlComments(xmlPath);});
 With the change to use XML path, the Swagger exposes the XML document in the UI.

Figure 6: Swagger UI Shows Documentation.

Swagger is supported in all major browsers and works in both local or on the web environment. The look and feel of the UI are customizable.

I showed before how it works on a local machine. The Swagger UI works well on the cloud. The same application deployed to Azure, https://smartstockapi.azurewebsites.net/swagger/index.html works as it worked in my local machine.

Figure 7: Swagger UI in Application Hosted in Cloud (Azure)

Resources/Materials/References:

Thursday, December 13, 2018

Using Object.keys() in JavaScript


Object.keys(obj) returns the name property of the object which becomes handy to enumerate the property names, in the same order as returned with a normal loop.

     Input:
const myObject = {  name: 'somename',  age: 40,  gender: 'female'};
console.log(Object.keys(myObject));
     Output:
["name", "age", "gender"]

For non-object, the return type is an empty array.
     Input:
console.log(Object.keys(''));
     Output:
[]

For input of array type, it is the index of the array.

     Input:
console.log(Object.keys(['hello', 'hello2']));
     Output:
["0", "1"]
And for input of type string, the output is the array of the index for characters.
     Input:
console.log(Object.keys('hello2'));
     Output:
["0", "1", "2", "3", "4", "5"]

Syntax:
Object.keys(obj)
Parameter:
The object of which the enumerable's own properties are to be returned.
Return value:
An array of strings representing all the enumerable properties of the given object.
Exception:
Throws exception if parameter is not a valid object i.e.  null or undefined.