In this post, I will be discussing how to deploy an application from an Azure Container Registry (ACR) to Azure Kubernetes Service (AKS). The recipe for storing applicaiton image to ACR is discussed in Storing image to the Azure Container Registry (ACR). This post is part of the Azure Kubernetes Service (AKS) Deployment Recipes.

"appId": "e36d80f2-3462-402d-9782-81144978dc03",
"displayName": "azure-cli-2020-10-18-19-37-49",
"name": "http://azure-cli-2020-10-18-19-37-49",
"password": "o0Ryfiy5dyaeF~KgKY8-PMA_VcfkEwc.3K",
"tenant": "fc0b9234-6aeb-43f8-9e70-5a4ee6dc849a"
}
To access the stored images from the ACR, I must grant AKS service principal the necessary rights. I will get the id of the ACR resource and store this into variable $acrId = az acr show -n livestreaming --resource-group livestreaming --query "id" -o tsv
Next, I intend to grant the reader role to the AKS cluster with Az role assignment create --assignee “e36d80f2-3462-402d-9782-81144978dc03” --role Reader --scope $acrId using the id of the service principal I had created earlier.

Since I have now added a role to Service Principal, I created
earlier any application with the service principal can get the image from the ACR.
Next, I am going to create AKS cluster by specifying a name of ‘livestreaming”,
into resource group of “livestreaming”, and desired node count of 1. I am also instructing
Azure to generate ssh keys and by specifying id and password of the Service Principal
that I created earlier.
az aks
get-credentials --name livestreaming -g livestreaming
Now if I peek
into the Kubernetes cluster’s config running into my local machine, I can see
find the reference of the AKS cluster in my config using the following command:
cat
C:\users\benktesh\.kube\config | sls "livestreaming"

- Change the image name to reflect the login server livestreaming.azurecr.io/livesreaming:v1. The details of the login server can be obtained by executing az acr list -g livestreaming -o table command.
- Change the service type as ‘LoadBalancer’ from ‘NodePort’
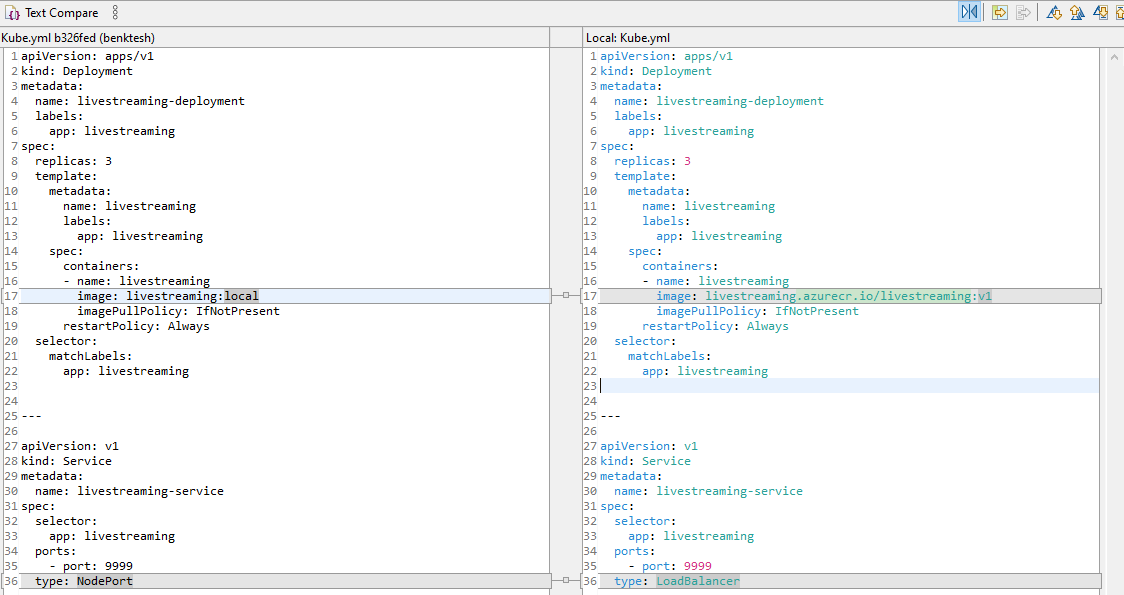
The above changes will ensure that the image is pulled from the
ACR and request to the application is routed through a load balancer.
With these changes I can deploy using the kubectl apply command that I used to deploy the application to local AKS cluster using the steps described Deploying to Kubernetes.

The External IP for the deployed application will be available after which I can browse to my application in the AKS. When I browse to the external IP listed for the service, I can see my application's user interface. This confirms that I ahve successfully deployed my application to the AKS.

Reference and further reading
Set up development environment for Azure Kubernetes Service (AKS) deployment
Create a Docker image of an application
Deploy an application image to Kubernetes
Store image to the Azure Container Registry (ACR)
Thanks for sharing.Very interesting blog.
ReplyDeleteDevOps Training
DevOps Online Training
Thank you for sharing. very helpful Blog!!
ReplyDeleteDevOps Training
DevOps Online Training